|
Note: This page and any Portable Document Format (PDF) or similar files linked from this page are part of an archive and might not contain current information.
On This Page
Bus Access | Accessible Features | Boarding a Bus | Using a Lift | Using a Ramp | Using the Securement Area | Customer Tips (Bus)
Bus Access
Muni provides accessible bus service on a comprehensive network of routes. Your Muni fleet includes electric trolleys and clean diesel coaches. Hybrid, low-floor vehicles are being added to the fleet. All vehicles are equipped with a variety of features to make bus travel easier and more pleasant for seniors and people with disabilities.
Accessible Features
- Priority Seating: The first aisle facing and forward facing seats are reserved for seniors and people with disabilities and are identified by blue decals on the windows above the seats. On some vehicles the seats are identified by blue seat inserts as well as by the decals.
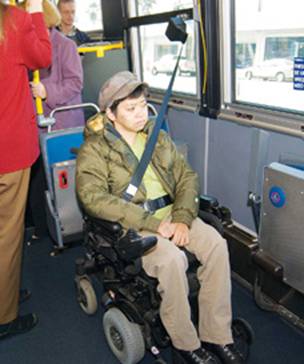
Muni customer positioned in wheelchair securement area
- Wheelchair lifts: Most buses are equipped with mechanical lifts that enable passengers with mobility disabilities to board. Lift platforms on most buses are at least 4 feet long and 3 feet wide. They are solid and sturdy, with handrails on both sides. There is enough turning room inside the bus to accommodate most standard manual and power wheelchairs, including three-wheeled models.
- Wheelchair ramps: Muni’s new fleet of low-floor hybrid coaches is equipped with 58 inch long by 31 inch wide bi-fold ramps, which have two ramp sections and a hinge in the center. The bi-fold allows for a longer ramp, reducing the slope when the ramp is deployed in the street. Because the ramp-equipped vehicles are low-floor, they allow level boarding when the bus is kneeled and the ramp is deployed at curb and island stops.
- Securement areas: Most Muni buses have two wheelchair securement areas equipped with clamps, belts and four-point securements. Some older, smaller vehicles may only have one securement area.
- Accessible Stop Request feature: A blue button or a yellow strip located under the flip seat or on the wall adjacent to securement areas can be used to let the driver know when a wheelchair user wants to get off.
- Kneelers: Lower the front steps of accessible buses by several inches, making it easier for customers to board the bus, especially if boarding from the street.
- Stanchions: Vertical and horizontal poles for standing customers to hold. Hanging straps are also provided.
- Destination signs: On most of the fleet, digital signs on the front, sides and rear display the line name and destination. A recorded voice announces the same information to waiting passengers whenever the doors open.
- Interior stop announcements: On most of the fleet, digital signs display the names of upcoming stops along with customer tips. A recorded voice simultaneously announces the same information.
Boarding a Bus
Lifts and ramps are for customers who are unable to use the steps to board, including customers who use wheelchairs, walkers, crutches or other mobility aids. Customers with less visible disabilities such as joint, cardiac or pulmonary ailments may also use a lift or ramp. The bus operator will assist you to board using the kneeler, lift or ramp, and will help you with the wheelchair securements, upon request.
Note: Please note that lifts are not intended for non-disabled customers with baby strollers, package carts, etc.
Using a lift
Be sure to position yourself so that the bus operator can see you as the bus nears the stop, and to stay clear of the lift as it is being deployed.
Lift users who are ambulatory should stand facing forward on the lift and grasp the handrails. Be aware that you may need to duck to avoid hitting your head on the top of the door.
If you use a wheelchair you may board facing forward or backward, though many customers prefer facing backward. Be sure you are centered on the lift, and lock your wheels before the lift raises or lowers.
Tell the bus operator your destination stop as soon as you board the vehicle, and then proceed down the aisle to the securement area. Be sure to warn customers seated along the aisle to watch their feet!
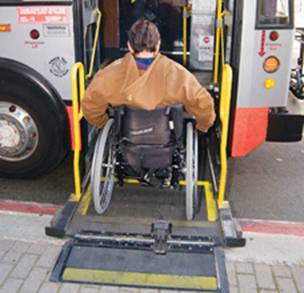
Wheelchair user boards Muni bus access lift
Note: There are some stops where wheelchair lift or ramp deployment is not recommended because the grade is too steep, there are no curb cuts, or the sidewalk is too narrow. These stops are clearly marked by a “Stop bar with hazard triangles” symbol painted on the street.

Stop bar with hazard triangles
Using a Ramp
Be sure to position yourself so that the bus operator can see you as the bus approaches the stop, and stay clear of the ramp as it is being deployed.
The ramp may be deployed at a curb or island stop or onto the street. The ramp will be nearly level when deployed for boarding at a curb or island. When deployed in the street the ramp slope will be steeper and you should use extra caution. Customers who use a manual wheelchair and feel that they cannot make it up or down the ramp safely should ask the operator for assistance.
Using the Securement Area
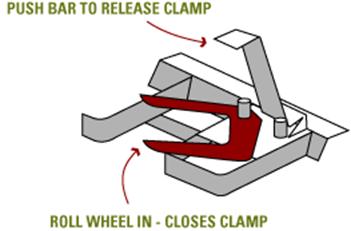
Wheelchair clamp user diagram
The securement areas are created by lifting up either the first row of forward-facing seats or the second set of aisle-facing seats at the front of the bus. Pull the lever underneath the aisle side seat and raise the bottom part of the seat to ready the securement area.
Back the wheelchair into the open wheel clamp to secure the chair. The wheel clamp fits most manual and some older style power chairs, but does not accommodate three-wheelers or other chairs with small back wheels.
In addition to the clamps, the securement areas are equipped with four-point securements which are four belts with hooks that can be attached to a wheelchair at each corner of its frame. The bus operator will assist with the securements upon request. There is also a seat belt that can be fastened around the chair back or the wheelchair user’s waist. Use of the seat belt is at the discretion of the customer.
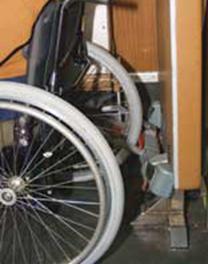
Wheelchair clamp and securements on Muni bus
The securement areas are designed to accommodate wheelchairs that are 30 inches by 48 inches. If you are concerned about whether your mobility device can be accommodated, please contact Accessible Services (415.701.4485; fax 415.701.4728; TTY 415.701.4730).
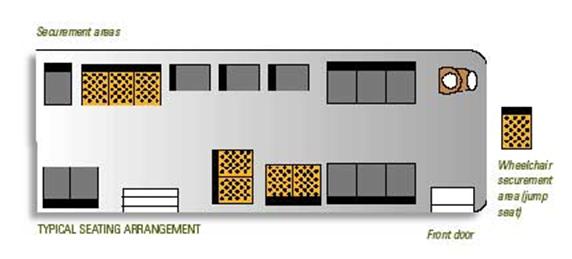
The above diagram of typical seating arrangement on Muni bus indicates the location of the two wheelchair securement areas and fold-up, “jump” seats. The securement area on the right side of the vehicle is often located behind the first seats adjacent to the front door and uses two sets jump seats. The left securement area is typically staggered further back from the front door from the right and uses a single set of jump seats.
It is Muni’s policy that customers with wheelchairs that do not fit in the wheel clamp must secure their chair with the four point securements. Inform the bus operator if you need assistance using the belts. It is important that the wheelchair clamp and/or securement belts are fastened, and that the wheelchair brakes are applied before the bus proceeds.
Customer Tips (Bus)
- On crowded buses, the priority seats may already be occupied by seniors and people with disabilities, or by other customers who simply decline to surrender a seat. Bus operators can ask passengers to give up their seats, but cannot force them to do so.
- Be sure to keep grocery carts, parcels, luggage, etc. out of the aisle.
- Stay clear of the vehicle after exiting — do not cross the street in front of the bus.
- If the lift fails while you are on it and Muni personnel are not able to repair it, the San Francisco Fire Department will be contacted to assist you.
Continue to Chapter 3:
Access on Muni Metro
Return to Table of Contents
|
